Preparation and Planning: Define the scope, goals, and participants.
Presenting the Design: Showcase the design to the team and collect feedback.
Gathering Feedback: Collect structured, actionable feedback from stakeholders.
Analyzing Feedback: Evaluate and prioritize feedback to guide revisions.
Revising the Design: Refine the design based on feedback.
Final Approval and Handoff: Finalize the design and provide developers with all necessary assets and specs.
Define the Scope and Objectives: Establish what aspects of the design you want feedback on—whether it's user experience, visual aesthetics, or functionality. For example, you might want to focus on usability in one review and visual design in another.
Identify the Right Participants: Involve stakeholders who can provide valuable insights. This may include designers, developers, project managers, marketers, and end-users. Make sure each participant knows their role and what kind of feedback is expected from them.
Set Clear Expectations: Let participants know the focus of the review and the timeline for feedback. This helps prevent unnecessary tangents and ensures that the meeting stays on track.
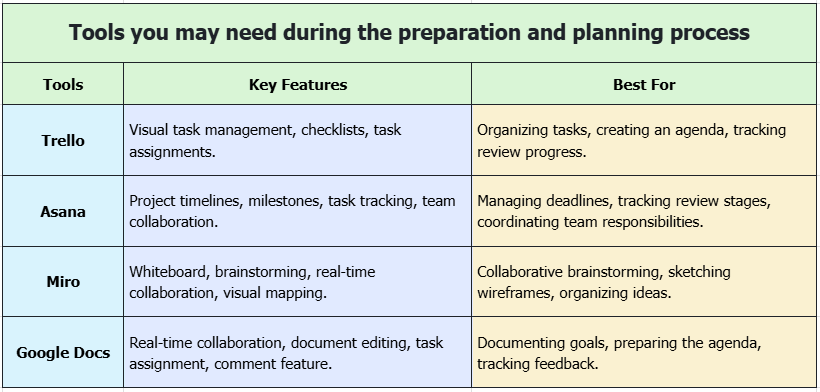
Trello: Great for organizing tasks and defining the agenda for the review. Trello’s visual task management features make it easy to track what needs to be reviewed and to assign tasks to team members.
Asana: Similar to Trello but with additional project management features like timeline views, which are useful for defining deadlines and milestones. Asana’s flexibility also makes it easy to track the progress of each review stage and manage team responsibilities.
Miro: Excellent for brainstorming and visualizing the structure of the review, especially if you need to sketch wireframes or flow diagrams during the planning phase. Miro’s real-time collaboration allows team members to contribute ideas and structure feedback simultaneously.
Google Docs: Useful for documenting the scope, objectives, and feedback guidelines, and for preparing a collaborative agenda where all team members can add their thoughts beforehand. It’s also a good place to keep track of feedback expectations and any key review dates.
Create a Clear Presentation: Focus on the key aspects of the design you want feedback on. Provide context, such as your design goals, target audience, and any challenges you faced.
Highlight Important Features: Walk through the design’s core features, like user flow, navigation, interactions, and key visual elements. This ensures that all stakeholders understand what to focus on during the review.
Facilitate Discussion: Encourage participants to ask questions, make suggestions, and discuss potential improvements. Facilitate an open, constructive dialogue.
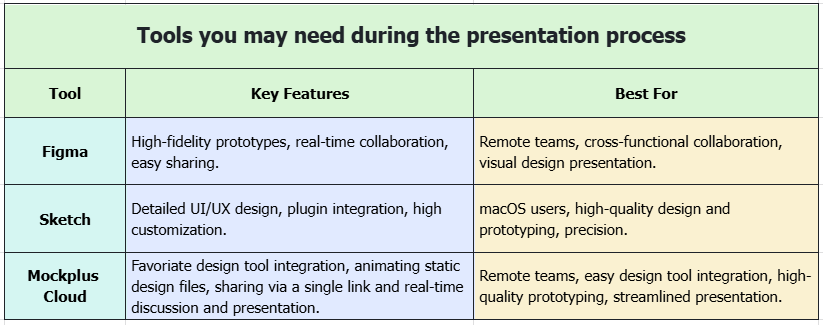
Figma: One of the most popular design tools, Figma allows you to create high-fidelity prototypes that are easy to share with stakeholders. It supports real-time collaboration, so everyone can view and comment on the design at once, making it ideal for remote teams or cross-functional collaboration.
Sketch: Widely used for UI/UX design, Sketch is great for creating detailed designs and prototypes. It's a favorite for macOS users, and many teams integrate it with other tools like InVision or Zeplin. Sketch allows you to design with precision, and its plugin ecosystem further enhances its capabilities, including real-time collaboration through integrated tools.
Mockplus Cloud: Mockplus Cloud enables easy presentation and collaboration on designs. You can simply import designs and assets from commonly used design tools, like Figma, Sketch, Adobe XD, Photoshop and Axure. And then, share a link to invite others to view and check the same design files, all in one central hub.
And even add hotspots to animate these static designs for better presentation.
With Mockplus Cloud, all stakeholders, like designers, developers, product managers, marketer and many more, can be gathered in one platform, share and review designs in one place, making it easier to manage feedback and streamline communication.
Encourage Detailed Feedback: Ask participants to provide specific feedback. For example, rather than just saying “I don’t like this,” they could explain why the design feels confusing or what could be improved.
Categorize Feedback: Organize feedback into categories like usability, visual design, content, and functionality. This makes it easier to evaluate the most important issues.
Collect Feedback from Various Stakeholders: Get input from all relevant stakeholders, from designers and developers to marketers and end-users, each bringing their perspective on the design.
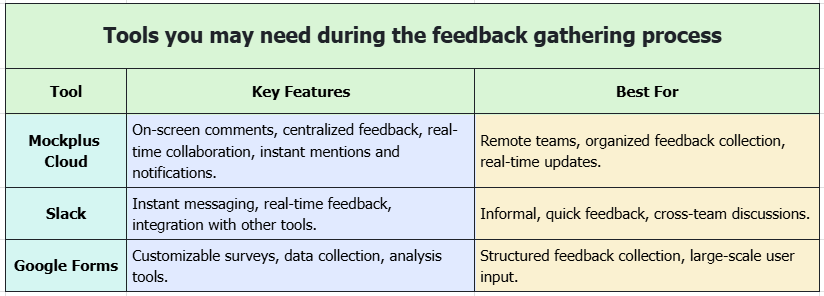
Mockplus Cloud: Collect feedback directly on the design. Stakeholders can leave comments at specific points on the prototypes and design files, allowing you to directly @mention anyone in your team to keep discussing and tracking any feedback more efficiently. This feature is especially useful for teams that work remotely, as it ensures that all feedback is centralized and easily accessible.
Slack: For quick feedback and informal discussions, Slack provides an instant communication channel where feedback can be given in real-time. It's also ideal for smaller teams or cross-departmental communication.
Google Forms: For more structured feedback, create a survey to collect input from a broader audience. This is particularly useful if you need to gather feedback from a large group of users or stakeholders. Google Forms allows you to collect feedback efficiently and analyze it in an organized way.
Filter Out Unnecessary Feedback: Not all feedback is equally valuable. Filter out comments that are not relevant to the project’s goals or that don’t align with the overall design vision.
Group Similar Feedback: Look for recurring themes or issues across different stakeholders. This helps to identify major design flaws or areas that need the most attention.
Prioritize Changes: Decide which feedback will have the greatest impact on the user experience, and prioritize making those changes first.
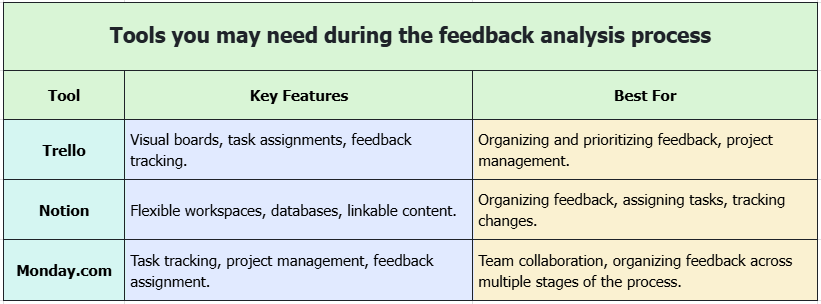
Trello: Use Trello to organize feedback into actionable tasks. You can create a board for each stage of the process, from gathering feedback to analyzing and implementing changes. Trello’s visual board view helps to easily prioritize tasks based on urgency and importance.
Notion: Notion offers a flexible workspace where you can organize feedback in a database format, track feedback themes, and assign action items. You can also link to the design files or prototypes for quick access.
Monday.com: A project management tool that helps you track feedback and revisions. You can assign tasks to team members and ensure that changes are made in a timely manner.
Implement Feedback: Use the feedback to refine and improve the design. This may involve fixing usability issues, enhancing visual appeal, or tweaking functionality.
Iterate and Test: After making changes, test the revised design with users to ensure the problems are addressed.
Figma: Excellent for design iteration, Figma allows you to quickly make changes and share updated versions with the team for feedback. It’s a great choice if your team needs to iterate and collaborate frequently.
Adobe XD: Known for its powerful design and prototyping tools, Adobe XD makes it easy to implement changes and test interactive elements. It integrates well with other Adobe products, offering a complete design solution.
Mockplus Cloud: With Mockplus Cloud, you can make design revisions and easily share updated prototypes and designs with the team. Its version control features allow you to keep track of all changes and compare different versions.

Conduct a Final Review: Ensure that all stakeholders are satisfied with the design. Double-check that the design meets the project’s original objectives.
Prepare for Handoff: Provide developers with all the resources they need, such as design assets, specifications, and code snippets.
Communicate Expectations: Make sure the developers understand the design’s objectives, user flows, and functionality. Offer support during the development phase if needed.
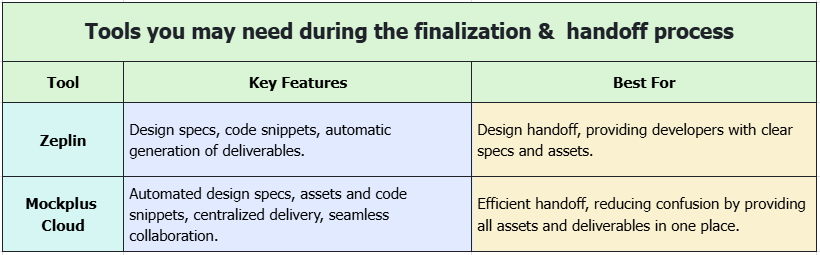
Zeplin: Zeplin is a popular tool for design handoff. It automatically generates design specs, code snippets, and asset files that developers can use.
Mockplus Cloud: With Mockplus Cloud, all design related deliverables, like measures, redlines, assets and code snippets, are automatically generated since you've imported the design files, so developers or dev teams can easily join via a single link, and get whatever they need with copies to start coding and programming as soon as possible.
 Mockplus RP
A free prototyping tool to create wireframes or interactive prototypes in minutes.
 Mockplus DT
A free UI design tool to design, animate, collaborate and handoff right in the browser.


 Sign up with Google